This little tutorial is designed to show how a texture image can be used to create a seamless, tile-able graphic suitable for use as a texture for Photoshop images, or as a background graphic for a webpage. Although any media, slide, photograph, piece of cloth or rock, can be used as the source for this tutorial, I am using an old glass negative from our glass negative collection, probably produced by a textile manufacturer many decades ago.
This image was originally a 3-1/2"x5-1/2" glass negative of a piece of pigskin fabric, photographer unknown. It was found in one of two boxes of Eastman Plates being thrown away.
![]()
The non-emulsion side of the glass negative was first cleaned of the mildew present upon it, using several drops of an ammonia-based glass cleaner and several coffee filters. The cleaned glass was then scanned, emulsion-side up against the cover, on a Linotype-Hell Jade2 30-bit flatbed scanner, using a scan resolution of 600 DPI. I prefer to scan at a much higher resolution than the final image will be, for the purpose of image cleanup. Figure #1 is the result of this scan.
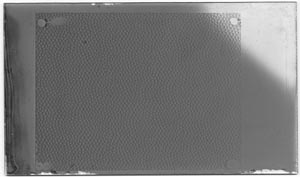
Figure #1 - Raw Scan of Glass Negative
![]()
The scanned image is then inverted, to produce a positive image. Figure #2 is the result of this edit.
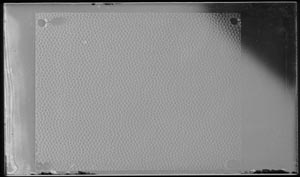
Figure #2 - Image Inverted to Produce a Positive
![]()
Using a Photoshop Noise filter, Dust & Scratches, with a threshold of 4 and a radius of 2 pixels, the image is of cleaned of the minute spots created by the damaged emulsion. When the image was inverted, the missing points of emulsion, due to poor handling and storage, converted from clear to black spots. The brightness and contrast was also fine-tuned at this point in the image manipulation process to achieve a pleasant balance. The last operation performed at this stage was the cropping of the image to an area of consistent density. Figure #3 is the result of these manipulations.
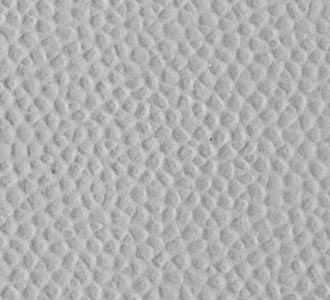
Figure #3 - Cropped Portion of the Full Image
![]()
The image was then Offset, both vertically and horizontally, to reveal the edges of the image, as they would appear when the image is tiled. Figure #4 is the result of the offsetting. Although the seam is faintly visible, the seam would truly stand out once the image is tiled several times.
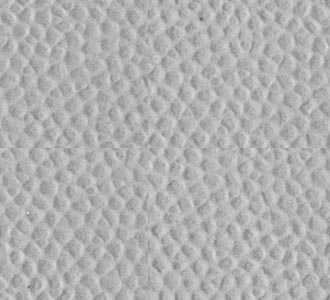
Figure #4 - Offset of Image for Making a Seamless Version
![]()
Photoshop's Rubber-Stamp Tool is used to clone parts of the texture over the seam, rendering the seam less visible. This is one of those effects that could be very time-consuming, depending upon the level of perfection desired by the artist. Personally, I prefer to make the seam just not visible, to keep my image manipulation time brief. As the intent of this texture is for background use, it will not get full attention. Figure #5 is the result of this manipulation.
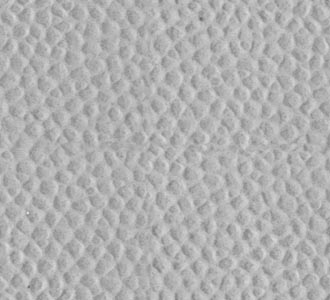
Figure #5 - Image After Cloning Out Seam
![]()
After the greyscale image has been made seamless, from the above step, it can be used as a background texture in other images in Photoshop, as shown in Figure #7, below, applied to a textureless yellow image. Or, it can be colorized by any number of methods in Photoshop, after converting the image to a color model space. For webpage backgrounds, the RGB color space is preferred.
For the background image used on this webpage, I added three layers to the greyscale background image. The top layer is a light magenta color, with a layer opacity of 57% and the layer effect set to lighten. The next layer down is a cyan color, with a layer opacity of 97% and the layer effect set to hard light. The next layer down is a yellow color, with a layer opacity of 100% and the layer effect set to color. Figure #6 is the result of applying these manipulations, but without the yellow layer, to allow the viewer to understand the subtle changes afforded by mixing color layers.
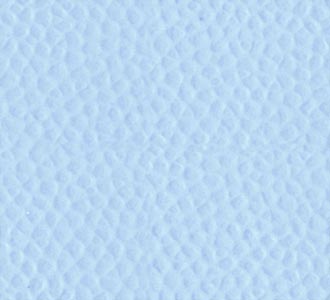
Figure #6 - Image After Colorizing
![]()
Textures can be applied to entire images, or simply to portions of an image (using masks) to enhance an otherwise flat portion of the image. A flat sky can be enhanced by applying a texture to it, as well as a portrait with flat features due to too strong or badly placed lighting.

Figure #7 - Pigskin Texture Applied to a Textureless Yellow Image
Scan, experiment and have fun!
If anyone would like any further information, I can be reached by email at dave@the-hurds.com
![]()
This webpage last revised on 26 May 2012.
Return to My Homepage